
Overview
As the official page of Apache Kafka sais: “Kafka is a distributed, partitioned, replicated commit log service. It provides the functionality of a messaging system”. Most of you probably worked before with other messaging systems like ActiveMQ, RabbitMQ or SonicMQ, well Kafka is just like the others, but it is designed for distributed setup.

Introduction
In most enterprise systems, where you have at least a couple of application servers, where backend is separated from frontend, you will need to ensure a flowless communication between all components. One option is to use a messaging system like Kafka.
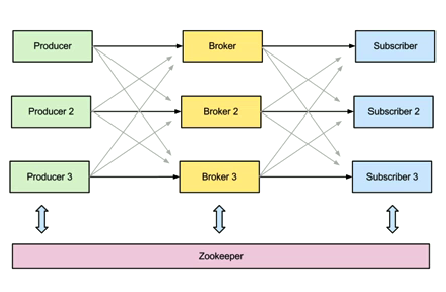
How does it work? Simple. You have a messaging cluster, you have producers, you have subscribers and you have topics. In this article we will set up the cluster. Usually custom applications play the role of a subscriber and of a producer. Producers and subscribers communicate with each other by using the cluster and a common topic.
In the below picture, brokers are actually Kafka servers running on different VMs, subscribers and producers are components of your application. You can see that we have a 4th component named Zookeeper. Zookeeper is used for synchronization between the brokers. If you want to read more details about it please check out the official page.
I have set up a 2 broker Kafka system, every broker will be installed on it’s own Centos6.5 VM.
Prerequisite
-
Set up 2 VMS, it can be Virtualbox, Vmware, AWS, … anything you chose as long as you make sure the virtual machines can communicate with each other. If you want to play around with kafka the fastest way is to create the environment is by using vagrant and virtualbox.We will call the 2 centos servers: kafka1 and kafka2, each server reprezenting a broker.
-
Set hostname of your 2 vms. Edit etc/sysconfig/network and set “HOSTNAME=kafka1” on the 1st VM and “HOSTNAME=kafka2” on the second.
vi /etc/sysconfig/network
...
HOSTNAME=kafka1
vi /etc/sysconfig/network
...
HOSTNAME=kafka2- Make sure the servers will have knowledge of each other’s name. If you are not managing your own DNS this can be done by adding the following 2 lines in /etc/hosts file on both vms:
vi /etc/hosts
...

192.168.10.10      kafka1
192.168.10.11 kafka2- I am assuming that kafka1 VM has the ip of 192.168.10.10 and kafka2 has the ip of 192.168.10.11 . You can replace these values with your own ips Update the servers and install openjdk.. For this please run the following commands on both vms:
yum -y update
yum -y install java-1.7.0-openjdk
Installing kafka
- Download kafka binaries and extract them. I am using my home directory for this but you can you /usr/local for example.
cd ~
wget http://mirrors.hostingromania.ro/apache.org/kafka/0.8.1.1/kafka_2.8.0-0.8.1.1.tgz
tar xzf kafka_2.8.0-0.8.1.1.tgz
cd Kafka_2.8.0-0.8.1.1- Edit configuration files.
There are 2 important services that you will need to work with here: Zookeeper server and Kafka Server. Zookeeper is used for providing distributed synchronization between all brokers and will only be run on the kafka1 VM. Kafka server will be run on both VMs. There are 2 important files you need to keep in mind here, config/zookeeper.properties and config/server.properties. As sprevously specified you will run zookeeper only on the first vm, so you need to make sure to properly set config/zookeeper.properties on kafka1.By default you have 2 important settings you need to set here: dataDir and clientPort, but these can be left to their default values.
vi config/zookeeper.properties
....
dataDir=/tmp/zookeeper
clientPort=2181
Edit config/server.properties file on both kafka1 VM and kafka2 VM. The important fields you need to set up here are broker.id, port, host.name and zookeeper.connect
kafka1 VM:
vi config/server.properties
....
broker.id=0
port=9092
host.name=kafka1
zookeeper.connect=kafka1:2181
kafka2 VM:
vi config/server.properties
....
broker.id=1
port=9092
host.name=kafka2
zookeeper.connect=kafka1:2181
Brokers will need to use different ids, but the port can be the same as long as you are not starting up 2 brokers on the same VM(ourt case). Also please note that you will use the same connection to the zookeeper server. This will be running on kafka1 VM on port 2181.
- Start up the servers.
Now that the configuration has been set up you can start up your servers:
kafka1 VM:
bin/zookeeper-server-start.sh config/zookeeper.properties
bin/kafka-server-start.sh config/server.properties
kafka2 VM:
bin/kafka-server-start.sh config/server.propertiesTesting you messinging system
- First you need to make sure you have your services running. You will have ports 9092, 2181 opened on kafka1 VM and port 9092 on kafka2 VM
netstat -ntlp
tcp 0 0 :::9092 :::* LISTEN 11493/java
tcp 0 0 :::2181 :::* LISTEN 11429/java- Create a new topic. Kafka maintains feeds of messages in categories called _topics. _You can see the topic as a queue, where someone puts data in and someone takes data out. The name of the topic is “test” and the topic’s replication factor will be 2, because we have 2 running brokers. You can run the following command on any VM.
bin/kafka-topics.sh --create --zookeeper kafka1:2181 --replication-factor 2 --partitions 1 --topic test- Make sore the topic has been creates succesfully
bin/kafka-topics.sh --list --zookeeper cafka1:2181- You can see some details of the created topic with the command:
bin/kafka-topics.sh --describe --zookeeper kafka1:2181 --topic test- Publish a message on the topic. By running this command you will enter in a console mode where you can send messages folowed by the “enter” key.
bin/kafka-console-producer.sh --broker-list kafka1:9092 --topic test- start a consummer. If all goes well, all messages you have published in the prevoius step should now be consumed, and shown to the screen.
bin/kafka-console-consumer.sh --zookeeper kafka1:2181 --from-beginning --topicFor more advanced details on Apache Kafka messaging system please visit to the official page.